Crispy AIP Coconut and Tapioca Flour Waffles
There’s nothing quite like starting the day with a batch of warm, crispy waffles. When I began my journey on the Autoimmune Protocol (AIP), I knew that I wanted to find a way to still enjoy some of my favorite breakfast dishes while adhering to my new lifestyle. And after some experimenting, I’ve come up with the perfect recipe for Crispy AIP Waffles that you’re going to love!
These waffles are made using coconut flour and tapioca flour—two AIP-approved flours that not only provide a great texture but also work together to create that ideal crispy exterior. I’ve also swapped out traditional sweeteners for honey, which adds a natural sweetness, and avocado oil as a healthy fat substitute for coconut oil. The result? Waffles that are not only delicious but also free from eggs, dairy, gluten, and nuts—perfect for anyone with food sensitivities or following an AIP lifestyle.
Ingredients
Dry Ingredients:
- 1/4 cup coconut flour: This highly absorbent flour helps create a soft and delicate interior for the waffles. It’s naturally grain-free and perfect for AIP baking.
- 1/2 cup tapioca flour: Tapioca flour is what gives these waffles that perfect crispy texture. It’s light, slightly starchy, and essential for achieving that golden crust.
- 1/2 teaspoon baking soda: A natural leavening agent that helps the waffles rise and become fluffy.
- Pinch of sea salt: A small amount of sea salt brings out the sweetness in the waffles and balances the flavors.
- 1/2 teaspoon cinnamon (optional): While cinnamon is optional, it adds a warm, aromatic flavor that complements the natural sweetness of the waffles beautifully.
Wet Ingredients:
- 1/2 cup coconut milk: Make sure to use full-fat coconut milk for a richer batter. The creaminess of the coconut milk adds moisture and a slight coconut flavor to the waffles without overpowering them.
- 3 tablespoons avocado oil: Avocado oil is neutral in flavor and provides a healthier fat source that helps make the waffles crisp and golden. I prefer this over coconut oil for its lighter taste and nutrient profile.
- 1 tablespoon honey: I’ve chosen honey as the sweetener for this recipe. It adds a delicate sweetness without being too overpowering, and it’s compliant with the AIP diet. You can adjust the amount depending on your taste.
- 1 teaspoon apple cider vinegar: This helps react with the baking soda to create a slight rise in the waffles, giving them a fluffy, airy texture.
- 1/4 cup water (adjust as needed): The water helps adjust the consistency of the batter. Depending on how thick or thin you like your waffle batter, you can add more or less water to get the desired texture.
Directions
- Preheat your waffle iron: Before you start making your batter, make sure to preheat your waffle maker according to the manufacturer’s instructions. Lightly grease it with avocado oil to prevent sticking and ensure a crispy result.
- Mix the dry ingredients:
In a medium mixing bowl, combine your dry ingredients. Start by sifting together 1/4 cup of coconut flour and 1/2 cup of tapioca flour to remove any lumps. Coconut flour can sometimes be a bit clumpy, so it’s important to sift it well. Add in 1/2 teaspoon of baking soda, a pinch of sea salt, and 1/2 teaspoon of cinnamon if you’re using it. Whisk everything together to ensure the ingredients are evenly distributed. - Prepare the wet ingredients:
In a separate bowl, whisk together your wet ingredients. Pour in 1/2 cup of coconut milk and 3 tablespoons of avocado oil. The coconut milk adds creaminess while the avocado oil will help make the waffles crisp and light. Then, stir in 1 tablespoon of honey for a hint of natural sweetness. Lastly, add 1 teaspoon of apple cider vinegar to help activate the baking soda and give the waffles some lift. Whisk everything until smooth. - Combine the wet and dry ingredients:
Slowly pour the wet ingredients into the bowl with the dry ingredients, stirring as you go. Mix the batter until it’s smooth and free of lumps, but be careful not to overmix. Coconut flour tends to absorb liquid quickly, so if your batter looks too thick, gradually add 1/4 cup of water, stirring after each addition. The goal is to achieve a thick but pourable consistency. If needed, you can add a little more water to loosen the batter. - Cook the waffles:
Once your waffle iron is preheated and the batter is ready, spoon the batter into the waffle iron. Be careful not to overfill the waffle maker—about 1/4 to 1/3 cup of batter per waffle should be enough. Close the waffle maker and cook the waffles according to the manufacturer’s instructions, or until they are golden brown and crispy. This may take 5-8 minutes, depending on your waffle maker. - Serve and enjoy:
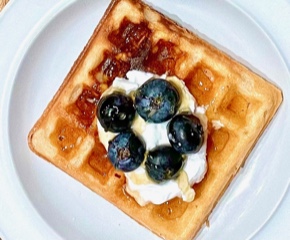
When the waffles are cooked to perfection, carefully remove them from the waffle iron and place them on a plate. Serve with your favorite AIP-friendly toppings, such as fresh fruit, coconut yogurt, or a drizzle of additional honey for an extra touch of sweetness. These waffles are best enjoyed fresh out of the waffle maker, while they’re still crispy and warm.
Why These Waffles Are So Great:
- Crispy and Delicious: The combination of tapioca flour and avocado oil creates waffles that have a crispy exterior and a soft, fluffy interior—everything you could want in a waffle.
- Naturally Sweetened: With just a touch of honey, these waffles are lightly sweet without any refined sugars, making them a healthier option.
- Allergen-Friendly: Free from gluten, dairy, eggs, and nuts, these waffles are perfect for anyone following the Autoimmune Protocol or dealing with food sensitivities.
- Versatile: You can enjoy these waffles with a variety of AIP-compliant toppings. From fresh berries to coconut yogurt, the possibilities are endless.
Final Thoughts
I hope you enjoy making (and eating!) these Crispy AIP Coconut and Tapioca Flour Waffles as much as I do. They’re perfect for a special weekend breakfast or even a mid-week treat when you need something quick and satisfying. Whether you’re new to the AIP diet or have been following it for a while, this recipe is sure to become a staple in your kitchen.
Try out the recipe and let me know in the comments how it turned out for you! I love hearing about your AIP journey and how you’re incorporating these recipes into your life. Don’t forget to share this recipe with anyone who’s looking for a delicious, crispy waffle recipe that’s also AIP-friendly.
Enjoy the journey to better health, one crispy waffle at a time!
THE BEST AIP WAFFLES
Course: DESERTS, Elimination PhaseCuisine: Belgian, AmericanDifficulty: Easy4
servings10
minutes15
minutes150
kcalThese Crispy AIP Coconut and Tapioca Flour Waffles are the perfect AIP-friendly breakfast treat! Light, crisp, and naturally sweetened with honey, they’re free from gluten, dairy, eggs, and nuts. Made with a blend of coconut and tapioca flour, plus avocado oil for extra crispiness, they offer a delicious way to start your day on the Autoimmune Protocol.
Ingredients
- Dry Ingredients
1/4 cup (28 g) coconut flour
1/2 cup (60 g) tapioca flour
1/2 teaspoon baking soda
1/4 teaspoon (2 g) sea salt
1/2 teaspoon (2 g) cinnamon (optional)
- Wet Ingredients
1/2 cup (120 ml) coconut milk
3 tablespoons (42 g) avocado oil
1 tablespoon (20 g) maple syrup or honey
1 teaspoon (5 ml) apple cider vinegar
1/4 cup (60 ml) water as needed
Directions
- In a medium mixing bowl, combine your dry ingredients: coconut flour, tapioca flour, baking soda, sea salt and cinnamon.
- In a separate bowl, whisk together your wet ingredients: coconut milk, avocado oil, maple syrup or honey, apple cider vinegar.
- Slowly pour the wet ingredients into the bowl with the dry ingredients, stirring as you go. Mix the batter until it’s smooth and free of lumps, but be careful not to over mix. Coconut flour tends to absorb liquid quickly, so if your batter looks too thick, gradually add water stirring after each addition until you obtain a thick but pourable consistency.
- Preheat the waffle maker according to the manufacturer’s instructions.
- Spoon the batter into the waffle iron. Be careful not to overfill the waffle maker—about 1/4 to 1/3 cup of batter per waffle should be enough. Close the waffle maker and cook the waffles according to the manufacturer’s instructions, or until they are golden brown and crispy. This may take 5-8 minutes, depending on your waffle maker.
- Carefully remove them from the waffle iron and place them on a plate. Serve with your favorite AIP-friendly toppings, such as fresh fruit, coconut yogurt, or a drizzle of additional honey for an extra touch of sweetness.
Recipe Video
Notes
- Make the batter in advance: While it’s best to cook the waffles right after mixing the batter for the crispiest texture, you can make the batter up to 1 day in advance. Store it in an airtight container in the fridge, and give it a good stir before using, as coconut flour absorbs liquid and may thicken overnight. You might need to add a small amount of water to adjust the consistency.
- Freezing the waffles: You can also make the waffles ahead of time and freeze them for a quick breakfast. Let them cool completely, then place them in a single layer on a baking sheet in the freezer. Once frozen, transfer them to a freezer-safe bag or container. When you’re ready to enjoy them, just pop the frozen waffles in a toaster or oven to reheat until crisp.
- Adjusting sweetness: If you prefer a sweeter waffle, you can increase the honey slightly or drizzle more over the waffles after cooking. For a more neutral waffle base, reduce the honey in the batter.
- Custom toppings: These waffles are versatile! Try them with fresh berries, coconut yogurt, or a drizzle of AIP-compliant honey or maple syrup for extra flavor.


